Friday, February 24, 2012

M4T: Tutorials & WiZIQ Live Classes


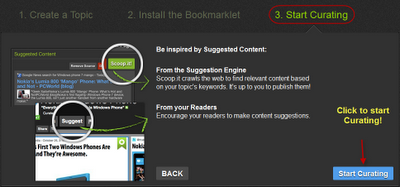
One of the most beneficial strategies that our moderators have used during M4T workshop is Scaffolding. They were available all the time answering questions and solving problems. Video Tutorials are one tool through which they gave us a hand by voice and picture. As I said in a previous post, the expected teacher in the few years coming will be YOUTUBE Videos not a person. Now, I can learn to do anything with the help of some videos. I don't need to take face-to-face courses any more. That's why I thought to collect all the tutorials that were created by our moderators in this workshop. This will help others with the same interest.


How to Create an account and log into 
M4T EVO2012 Session


Email Notifications Can Be Stopped 
with One Click


 How to Add your Skype ID


 Resources, Activities and the Course 
Sandbox 


Moodle Buddy Groups on Profile


How to Contact your Moodle Buddy


Moodle Sandbox


During the 5 weeks of this session, there were other tools that our moderators used. One of them was WiZIQ. WiZIQ offers a rich set of intuitive tools for online teaching. You can teach courses live and online in their Virtual Classroom. You can also join their vast network of teachers and learners for free. Third, you have the chance to integrate the WiZIQ virtual classroom with your websites.


Here are the Live Classes of M4T EVO2012 Session:

These are the M4T EVO 2012 Workshop's tutorials and live classes that helped me a lot to be on the right track during these 5 weeks. As I said before, Moodle has a variety of features that can suit all my students' learning styles and multiple intelligences. I think that it's time to integrate such wonderful tool in our EFL classrooms. I will try it and share the results with you here. 
I have a last word to you my dear moderators and colleagues. I just want to send a big THANK YOU to everyone of you for your support, help and collaboration. I never forget these happy moments. Really, it is my first real collaboration with a colleague. I liked all the experience in spite of the problems concerning the different time zones and my low internet connection. We can try it again and again. See you @ EVO 2013.

Thursday, February 23, 2012

M4T: Weeks Keep Surprises


As the title says the coming weeks of M4T session keep surprises. We tried a lot of things and communicated with each other to create a lesson plan. I have to admit that I faced some difficulties dealing with Moodle and its features. However, Dr. Nellie Tutorials were so beneficial and easy to be followed. Also, my colleagues helped me to gain some confidence to keep up the good work and never give up. One of the most wonderful things that I experienced was to collaborate with my buddy to complete some tasks. It was not easy to work together because of the different time zones, however, we managed to do most of the work. Here is a summary of what I did through the rest 4 weeks: 

Week 2 Tasks:
  • I explored the resources available on Moodle (e.g., labels, web links, file links, and web pages) and the activities (e.g., discussion forums, choices, assignments (upload), glossary, WizIQ live class, and wiki). Here is some of the work I have done:
  • I communicated with my Moodle Buddy 49 Team and practiced the resources and activities together. Also, we started to create our lesson plan. We were 3 at the beginning, however, one of us couldn't complete because she was busy. So, I completed most of our  work with my colleague "Maria Lucia from Italy". Really, I was happy to do this collaboration. It was my first real contribution with other colleagues from outside my country. I'm sure that it will not be the last TRY. I expect more work and projects in the next few months.

Week 3 Tasks:
  • I uploaded the word document that I created for my team lesson plan on the Moodle M4T2012EVO workshop in week 2 to Google Docs. 
  • I shared the link of the document with my Buddy 49 Maria Lucia Ercole as a public file until we finished editing and then closed it so no one can change the information.
  • I accessed the class Word Google Docs called Team Lesson Plans and filled in the information including the link to our Google Docs lesson plan.
  • I researched and discussed the meaning of authentic learning with my colleagues. I liked an article by Clif Mims. He talked about Authentic Learning in a very practical way. 
  • Clif Mims thinks that in order to make student learning relevant to real life experiences, learning environments must be authentic. If learning is authentic, then students should be engaged in genuine learning problems that foster the opportunity for them to make direct connections between the new material that is being learned and their prior knowledge. These kinds of experiences will increase student motivation. He goes on pointing out that there has long been a discrepancy between the traditional process of learning in schools and the process of learning in the real-world. As a result, students have been unable to see any real-life connection with what they learn in school. Authentic learning offers the opportunity for teachers to bring the outside world into the classroom. In doing so, students can begin creating those connections. This will empower them to transfer their knowledge and skill learned at school into their everyday lives outside of school, thus making the value of learning much more important to them. For me, this means that authentic learning is to bring real life into classrooms, to make use of what students learned to solve real problems, to create links and connections between what they learn and what they face in their everyday lives ..... in short to engage students to learn for life. 
  • I practiced Moodle activities and resources to develop our collaborative lesson plan in the team section of the sandbox. Here is an example of my work:
 
  • I added resources to the glossary. This is a great feature on Moodle. I think that it is beneficial to create a place where you can find all the key words defined and discussed. We can go there to clear our understanding and collaborate with other colleagues to collect definitions and resources.  Here is my resource that is about Authentic Learning: Authentic learning is a pedagogical approach that allows students to explore, discuss, and meaningfully construct concepts and relationships in contexts that involve real-world problems...... To read more, please click this wonderful article by Clif Mims.
  • I reflected in the wiki for the class on what I did in week 3 and how I feel at the end of the week. This is another great feature that we can find on Moodle. Reflecting on things helps me to know how far I achieved my goals and what I need to do in order to go a head in my work. Here is my reflection in week 3:

Week 4 Tasks:
  • I collaborated with my Buddy 49 "Maria Lucia Ercole" to create a Google Docs PowerPoint presentation for our team lesson. Maria made the first draft and I completed it adding and deleting some slides. Here is the final presentation

  • I created a WizIQ live class on Moodle for the team in our sandbox section. I uploaded the PowerPoint presentation and launched it on the time determined with Maria. We discussed our lesson using slides. Unfortunately, my voice was so low. I think that the reason behind this problem was my bad internet connection. However, we used the chatbox to direct our speech.
  • I recorded the WizIQ live class and shared the recording on the following Google Docs Document.

Week 5 Tasks:
  • I finalized my team PowerPoint presentation using Google Docs and shared the link with the rest of the participants in our  Google Docs Collaborative Presentations.
  • I created a video capturing my voice and screenshots of our lesson plan. I used  Knovio. Knovio™ is an innovative tool for turning PowerPoint® slides into rich video presentations with just a web browser and webcam. With Knovio, you can take static PowerPoint slides to a new level with video and audio presentations that can be accessed anytime on-demand and shared with others through email and social media. Here is our Moodle Buddy 49 video presentation:


  • I created my own individual PowerPoint presentation and added my voice to the slides reflecting on the process of the workshop. Here is my video presentation.
This is the end of the M4T workshop. However, I consider it the beginning for using such amazing tool with my students. As I said before, what makes Moodle unique is that you can use many things at the same place. You can upload materials, insert activities and resources, discuss in the forums, launch WiZIQ live classes, reflect using blogs or wikis .... and more. I'm sure that students will like it as it suits most of their learning styles.

Tuesday, February 21, 2012

Moodle 4 Teachers ....

EVO 2012 said Good Bye a few days ago, but it left a lot of doors open. For me, this EVO is different from last year. I completed all the tasks required throughout the five weeks. I learned new things and tools, knew new people of the same interest, gained new experiences, and also corrected some viewpoints and ideas that I have. One of these wrong ideas is that Moodle is not free and I have to pay to install it on my computer. I started M4T EVO12 session a little bit late, but I managed to complete and catch up all the tasks and discussions.

To Join this Workshop:
  • Click this link to go to the website hosted M4T 2012 EVO. 
    (
    Enrollment key: m4tevo)
  • Please register for an account in our Moodle.
  • Confirm your account by responding to the email we will send you.
Our Moderators:
Objective of M4T Session:

The objective of the M4T workshop is to provide participants, who have never used Moodle or who would like to enrich their previous Moodle experiences, with the knowledge and skills to navigate a Moodle course, access resources and activities from a student perspective, and practice the same resources and activities in the team and class sandboxes as teachers. 

Learning Outcomes of M4T Session:
  • Develop a working knowledge of Moodle as a learning management system for fully online and blended learning environments (a combination of face-to-face and online learning)
  • Learn to use Moodle features such as profile, discussion forums, assignments, chat, wiki, blog, choices, glossary, and WizIQ Class.
  • Create content using Moodle activities and resources.
  • Work collaboratively on a lesson with emphasis on group work, collaboration, communication, sharing, activities, and critical reflection.
  • Create a lesson on Moodle.

Week 1 Completed Tasks:
  • I took the Needs Assessment Survey, so the moderators can know more about me, why I participate and what I expect to gain from this workshop.
  • I introduced myself on the Moodle Forum and on Voicethread. This gave me more opportunities to know more people around the world and deepen my relations with those whom I have already known from other EVO sessions.
  • I loved the tool (VoiceThread) that was used to introduce ourselves. It is a collaborative, multimedia slide show that holds images, documents, and videos and allows people to navigate slides and leave comments in 5 ways - using voice (with a mic or telephone), text, audio file, or video (via a webcam). Share a VoiceThread with friends, students, and colleagues for them to record comments too. 
 
  • I took the Teacher Perspective Inventory (TIP) self-test and described my teaching style in the discussion forum. Really, I liked this inventory very much. It helps me to know more about the teaching style that I have. For me, I think that teachers should have all the five perspectives, but, of course with different degrees. We can take it many times after gaining new experiences and compare the results. I think that they will be different. I just want to say that we can have the five perspectives but not at the same time. I have taken this inventory twice, but the results are the same. I have the "Nurturing" perspective". For my surprise, I had the same sub-scores of Beliefs (B), Intention (I), and Actions (A). This means that my views with Nurturing Perspective are grounded equally in what I believe (Beliefs), what I intend to accomplish (Intention), and what educational actions I undertake in my teaching settings.

    Here are my results:

    First Time:
    Azhar Youssef ---  here are your TPI scores:

    14-JAN-12
    ----------------------
    Transmission total: (Tr) 33.00
    B=11; I=9; A=13
    Apprenticeship total: (Ap) 39.00
    B=9; I=15; A=15
    Developmental total: (Dv) 40.00
    B=13; I=13; A=14
    Nurturance total: (Nu) 44.00
    B=15; I=15; A=14

    Social Reform total: (SR) 35.00
    B=11; I=11; A=13
    ----------------------
    Beliefs total: (B) 59.00
    Intention total: (I) 63.00
    Action total: (A) 69.00
    ----------------------
    Mean: (M) 38.20
    Standard Deviation: (SD) 3.87
    HiT: (HiT) 42.00
    LoT: (LoT) 34.00
    ----------------------
    Overall Total: (T) 191.00

    Second Time:
    Azhar Youssef here are your TPI scores:
     
     14-JAN-12
    ----------------------
    Transmission total: (Tr) 37.00
    B=13; I=10; A=14
    Apprenticeship total: (Ap) 42.00
    B=12; I=15; A=15
    Developmental total: (Dv) 40.00
    B=15; I=11; A=14
    Nurturance total: (Nu) 44.00
    B=15; I=15; A=14

    Social Reform total: (SR) 41.00
    B=13; I=14; A=14
    ----------------------
    Beliefs total: (B) 68.00
    Intention total: (I) 65.00
    Action total: (A) 71.00
    ----------------------
    Mean: (M) 40.80
    Standard Deviation: (SD) 2.32
    HiT: (HiT) 43.00
    LoT: (LoT) 38.00
    ----------------------
    Overall Total: (T) 204.00
     

    I think that Nurturing Perspective suits me to somewhat. According to this perspective, effective teaching assumes that long-term, hard, persistent effort to achieve comes from the heart, not the head. I think that If I trust and believe in my students' abilities, this will give them a chance to learn more. However, these days I move towards another perspective that is "Social Reform". I try to link what students learn to what they have in their everyday lives because they will enter their practical lives soon. And I want them to have an effective role in their society. They can change thinking ways and this what they have done in their project "Welcome Back Egypt". They wanted to give a hand to their country after the revolution. They felt very proud that they made a difference in others' lives. One last word to say, I think that teaching perspectives are not static. They are changing all the time as a result to our professional development.
  • I also explored the meaning of Moodle and why it was created. We were asked to study the provided resources or search the internet and then share our thoughts on Explore, Search, and Share: What is Moodle? forum. As I love learning through videos, I watched three videos and found a lot of interesting information:

What is Moodle? 


What can Moodle do for you?


How to Install Moodle?
 
 
  • Definition:  Moodle is an open source, online, interactive teaching and learning environment. It allows both teachers and students to communicate in real time, upload and download materials and create interesting classroom environment without learning HTML or any other programming language.  
  • What can Moodle do? You can use forums, wikis, blogs, online chatting .... etc. Really, Moodle is a very fantastic tool that suits all students' learning styles and provides multiple methods for learning the same material. Also, you can embed a lot of tools, e.g., vokis, videos, podcasts, quizzes ... etc. Your students can work collaboratively, vote and self or peer assess .... a lot of things you can do at the same place. 
  •  Is it difficult to have Moodle on your computer? Of course not, it is so easy to install Moodle. You just need a Mini-Server (e.g., warmserver.com) and download the latest server. Then, you need to download Moodle from www.moodle.org.  
  • I created a Glog including all what I found and inserted these videos with some comments. Really, Glogster is a very innovative tool where we can use it to summarize what we read using text, audio, images and videos. 


    • What I liked most is the Support: Questions & Comments forum where we can ask questions, ask for help, add comments, and make suggestions. This forum helps me a lot during this workshop. 

      Week 1 provided us with the first guidelines to use Moodle in our classrooms. What is Moodle? and why was it created? were the main questions that needed answers and discussions. What I felt was that weeks keep surprises and more work ...

    Monday, February 20, 2012

    We are Losing our Listening ...

    Maureen Staiano asks in her article .... Do you ever find yourself mindlessly saying "uh huh" when someone is trying to tell you something only to have say just after "I'm sorry what did you say?" Have you been in a conversation with one of people and you are not really listening completely to what they have to say because you are too busy formulating your response? This is actually quite common and yet we think we are good communicators. In order to communicate effectively we have to be able to hear what the other person is saying. What I noticed is that all people talk a lot and listen a little. We want to say what bothers us, but nobody is listening to anyone. We think that we are very good communicators because we can express ourselves very well. However, communication is a two-way process. We have to speak and listen to each other. Losing one of these skills may result in many problems that can lead to disasters. Yes, our world nowadays is like a nightmare for me. If we respect and listen to each other, there will be no wars at all. People will live in peace and happiness forever. 

    One of the sound experts called Julian Treasure talks about this solution in his wonderful speech "5 ways to listen better". He started his talk by these words "We are losing our listening" and he ended it by encouraging us to teach listening skills in our classrooms. We as teachers are responsible for all what happened and will happen. We have to develop our students' listening skills as a habit and for life. Julian Treasure suggested 5 ways to listen better despite of all the noise that surrounds us.


    Are we a Deaf Generation?


    Here are the 5 ways that Julian Treasure suggested to listen better:
    1. 3 minutes a day of silence.
    2. Mixer ... listen to the different channels around you.
    3. Savouring .... enjoying mundane sounds. The hidden choir.
    4. Listening positions  .... playing with those filters.
    5. RASA  ....  Receive - Appreciate - Summarize - Ask.
    He also suggested some practical activities for teaching listening in our schools in his blog:
    1. Silence:
      Help students to experience this possibly for the first time in their lives. Teach about it (take a look at my blog on silence for some ideas) and then work up from short shared silences - maybe one minute to start with - to longer ones. This will be very precious for them, but also very challenging. Ask them to write or share their experience of these silences, and what silence means in their lives.
    2. Mixer:
      Take students to rich aural environments (start inside the school) and have them pair and log all the sound sources they hear. If you have the resources, let them experiment with multichannel sound.
    3. Savouring:
      Give students a multi-day project to notice sounds and bring their three favorites into class to share. If you have the resources (e.g., own a Zoom H2 digital recorder or similar) do this one small group at a time and have them record the sounds to play to all. You could do the same with sounds they dislike.
    4. Listening Positions:
      The most powerful of all. Pair students up and have A say what they had for breakfast while B listens from different positions (for example 1 I'm bored; 2 I want to be friends with this person; 3 I'm in a hurry; 4 what can I learn from this - please make up your own also). Have the As share their experiences at the end, then the Bs. Swap and repeat. If they get the principle that you can change reality by listening from a different place, that will be a great gift.
    5. RASA (Receive, Appreciate, Summarise, Ask):
      Practice each element by pairing up again and have listeners turn each element off and on while listening and then both people share their experience. Have them share about their general experience of being listened to at home, in school and elsewhere (especially by adults), and how it affects their own listening to others.
    We badly need to practice these activities in our everyday lives first, then we can do them with our children and students in schools. As the proverb says "A man can do no more than he can."  How can I teach students how to listen and I don't know how to listen to others. I think that we can use Julian's video as a beginning to use our ears wisely and enjoy all the sounds around us. Leave you with other videos by this great expert:
      
    Conscious Listening 


    The 4 Ways Sound Affects US


    Shh! Sound Health in 8 Steps 


    Happy Watching!


    Sunday, February 19, 2012

    Just ... Scoop.it!


    I just wanted to collect my PLNs and all what I created and tried on the web. I have already my own blogs, glogs, wikis and my delicious page .... I can put them there. Oh! No.  My mind thinks about something else that I saw 5 weeks ago, but I didn't care a lot about it. Carla Arena, our Digital Tools e-course's moderator, created one for us during EVO 2012 experience. It is Scoop.it. Let's know something about it.

    Scoop.it! 

    Scoop.it is a curation tool that enables you to create magazines and newsletters. It can help you track a topic of your choice and interest. 


    As you see, you don't need anything to begin curating. You can be a magazine editor in 5 minutes. Other people can suggest related articles, news, experiences ... for you, follow and share your topics. Here is a screenshot of my first curated page collecting all my products:


    Steps to create your curated page:
    • Sign up to create a free account.
    • Click "Create" a topic and complete the title, description, language, and key words.
    • Click "Upload" to upload a photo for your topic, if you wish. 
    • Click "Go" to move to the next step. 
    • Here is a screenshot explaining these steps:


    • In the second step, drag and drop the Scoop.it Button to your bookmark toolbar, then click "Next". Here is a screenshot of what you are going to do: 


    • In the third step, click Start Curating Button to start your magazine.


    • By clicking the Start Curating Button, you have 4 options.
    • The first option is to accept the posts suggested by the suggestion engine. On your Curate page, click on the green Scoop.it button at the top of each suggested content to add it to your topic.


    • The second option is to click "New Post" and paste the URL in the blank field or click the button "Write a post without URL"  as shown in the first screenshot below. Then, complete the title, description, upload an image and click post to add it in your curated page. 

    URL Option


    Write a Post without URL Option


    • The third option is to grab the content while navigating the web.When you are reading an article, website, a blog post or whatever is related to your topic, just click the "Scoop.it" Button on your bookmark toolbar. A window will open on your right of the page you are surfing. The title will automatically appear and you can write a description. If you don't like the image that appears with the content, you can upload your own by clicking "Upload your own Image". The screenshot below will clarify this option:

    • The fourth option is to accept content suggested by other users. Other Scoop.it users, as well as visitors of your topics, can suggest content to your topics (by using the “Suggest” button in your topic tool bar – this button replaces the “New Post” button for visitors) or by using the bookmarklet themselves (the bookmarklet indeed allows to add content to your own topics or to suggest content to topics you follow). Content suggested by users will appear in your list of suggested content, on top of content suggested by the engine. You can decide to accept them by clicking on the green Scoop.it button or not (click on the red Discard button). 
    • By doing these steps, you can create your first magazine. Each curated includes some tools and features so you can work on it later. From left to right, you can force to top, edit, tag, delete, +1, react, share, and rescoop. Really, it is a very easy and interesting tool. It deserves a TRY! 


    Here are some videos that can help you to start Curating

    Customization


    Edit a Topic


    Manage Sources


    Sharing Options


    Export Curation


    Domain Hosting


    Analytics


    The question that arises now ... how to use such innovative tool in teaching?
    Some ideas are:
    1. Students can collect their products throughout a project.
    2. Students can use it as an e-portfolio in which they can put their achievements, feedback, certificates, awards, ... during their school year.
    3. Students can read about some topics that the teacher specifies and write summaries for them. They can write a summary and insert an image with the title of each article.
    4. Teachers can use it a space where they can put the materials of their teaching.
    Waiting for other suggestions from you to add them to this list!


    Resources:
    • For more information, please visit this link